Monday, December 30, 2013

Bacon Wrapped Meatballs with Roasted Butternut Squash


I am supposed to be taking down my Christmas decorations right now. I'm blogging instead. I had a great day at work and just spent a fun time making this dinner with #3. She is a great helper in the kitchen, up until it comes time to put food in the oven. She tends to forget that the oven gets preheated and she reaches in and grabs the oven racks every time we cook. I don't know why she does that. She's now sitting on the couch watching cartoons with an ice cube on her hand. Poor thing.

Tonight's dinner was a yummy find over at PaleOMG. It really was super easy to make, especially since my hubby bought me new knives for Christmas and I was able to cut the butternut squash like it was butter. So happy!


So that squash up there looks a little funny. It's prepped but not cooked yet. Cube a whole medium butternut squash into bite sized pieces and put onto a baking sheet that has a piece of parchment paper on it. Coat with 3 TBSP of melted bacon fat and sprinkle with 1/4 tsp each of garlic powder, onion powder, and sea salt. I used a very large butternut squash and doubled all the rest of the ingredients. I eyeballed the bacon fat so I don't think I used 6 TBSP and I probably could have still just used 3. I also used pink Himalayan sea salt because I have found I love the flavor. It's got a slightly sweeter taste than regular sea salt. At least both my husband and I think so.

Put the pan of prepped squash aside and start on the meatballs. In a large bowl combine 1 pound ground pork, 1/2 onion that has been diced, 2 cloves garlic that is minced, and a little salt and pepper to taste. I used my medium Pampered Chef scoop to make the perfect sized meatballs and this made about 20. The original recipe says it makes only 10, so if you want BIG meatballs and only want to make 10, use the big PC scoop.

So, depending on how many meatballs you have, take that many pieces of bacon and cut them in half. (20 meatballs = 20 pieces of bacon.) Place the 2 halfs of the bacon on top of each other overlapping to make an X, then place the meatball in the center. Wrap the bacon around the meatball then place the meatball bacon seam side down on a pan lined with parchment paper. In the pic of #3 above you can see her making the meatballs and placing them on the parchment paper.

Both the meatballs and the squash take 20-30 minutes to cook, so put both pans in the oven and cook at the same time. Mine took closer to the 30 minutes and came out perfectly.


Verdict: This meal is a keeper! If anything, the squash was just delicious. We all loved it. I can't wait to make it again.

BACON WRAPPED PORK MEATBALLS
Makes 20 Meatballs

INGREDIENTS:
1lb ground pork
½ onion, diced
2 cloves garlic, minced
Salt & pepper to taste
20 pieces of bacon

INSTRUCTIONS:
1. Preheat oven to 375. Line baking sheet with parchment paper.
2. In large bowl, combine pork, diced onion, minced garlic, salt and pepper. Mix well.
3. Using medium Pampered Chef Scoop, form 20 meatballs.
4. Slice bacon in half.
5. Take 2 pieces of bacon (1 full piece that’s been cut in half) and form an X. In the center place the meatball. Wrap the bacon around the meatball and place seam side down on the parchment paper.
6. Bake for 20-30 minutes or until bacon is done.

ROASTED BUTTERNUT SQUASH
Serves 4

INGREDIENTS:
1 medium butternut squash
3 TBSP bacon fat
¼ tsp garlic powder
¼ tsp onion powder
¼ tsp Himalayan sea salt (or salt of choice)

INSTRUCTIONS:
1. Preheat oven to 375. Line baking sheet with parchment paper.
2. Peel and dice butternut squash into bite sized pieces. Spread out on the parchment paper.
3. Melt bacon fat and drizzle over squash.
4. Sprinkle salt and seasonings over squash.
5. Bake for 20-30 minutes or until squash is tender.

Sunday, December 29, 2013

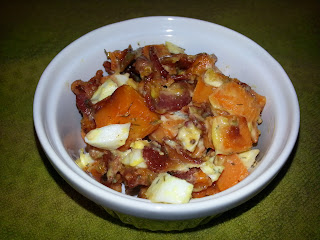
Sweet Potato, Bacon, and Egg Salad


I haven't blogged in a while. I'm really bad about that. So much has been happening around here. Hubby went back to work and has been working almost every weekend since the beginning of November, #2 turned 13, Christmas season was upon us, and the biggest change of all -- I went back to work. Right now I'm just the interim secretary at my church, but I might just be applying for the position once the church makes it available. It works out well to be there and the kids can come in with me and do their cyber school work in the church library while I'm working. Not a bad deal.

As for food, I've been sticking to easy meals. Some repeats, some new recipes, all Paleo friendly. The key things to remember when cooking Paleo is low carb, no grains, no refined sugar, lots of meat, veggies, and fat. Now, I'm not just talking bad fat, an avocado is fatty and good for you at the same time. All in moderation my friends.

With going back to work I'm now hunting down recipes that I can use for lunches. Of course I can always pack leftovers from dinner, but a lot of time we don't have leftovers. I do like buying flavored sausage links from my local Amish market because they are fresh and have no preservatives, but I just can't eat sausage every day. I found this recipe for a fun twist on egg salad. Keeping with the no preservatives theme, you need to make your own mayonnaise for this recipe. Don't get scared off, it's super easy. 1 egg, 2 tsp lemon juice, a generous pinch of salt, and 1 cup extra-light tasting olive oil. Follow the directions here and you'll have super yummy mayo that's healthy.

On to the lunch recipe! Hard boil 2 eggs, put in an ice bath, peel and dice. Dice 8 slices of bacon and cook for only 5 minutes. Peel and dice a medium sweet potato and add it to the bacon and cook until the bacon is done. Let the bacon and sweet potato mixture cool. In a container mix the diced eggs, 2 TBSP mayo, 2 TBSP lemon juice, 2 TBSP fresh dill (less if using dried dill.) Add the bacon and sweet potatoes when cooled. Mix up and eat warm or cold.

I'm actually looking forward to going to work tomorrow and eating this for lunch. I had a spoonful and it was tasty! Round this off with a piece of fruit, maybe some nuts, and I'm good to go.


SWEET POTATO, BACON, AND EGG SALAD
Serves 2

INGREDIENTS
1 medium sweet potato, diced
2 eggs
8 slices of bacon, diced
4 TBSP dill, finely chopped
2 TBSP mayonnaise (make it Paleo friendly with this recipe)
2 TBSP lemon juice

INSTRUCTIONS
1. Hard boil the eggs, rinse in cold water or ice bath, peel, and dice.
2. Heat skillet on medium-high heat. When hot, add diced bacon and cook for 5 minutes.
3. While bacon is cooking, peel and dice sweet potato. After the 5 minutes, add sweet potato to bacon. Continue to cook until potato is tender and bacon is fully cooked. Let cool.
4. In a small bowl mix eggs, dill, mayonnaise, and lemon juice.
5. When sweet potatoes and bacon are cool add to egg mixture and mix to combine. Serve warm or cold.

Thursday, November 28, 2013

A Paleo Thanksgiving


There are so many things I am thankful for.  I'm thankful my husband is home again, thankful for healthy kids, thankful for friends and family who love us.  There are so many things that I can't even begin to list them all.  One thing that I am thankful for is eating Paleo.  I've been cooking Paleo since early September and I've learned a few things.

1. I'm gluten intolerant.  I had my suspicions before, but despite the blood tests coming up negative, eliminating it from my diet and bringing it back in is a big no-no.  My body cannot tolerate it.  Without cutting gluten I would not have known.

2. I like food.  I like good food.  I'm finding there are a lot of good recipes that are just plain delicious and are Paleo friendly.

3. Paleo cooking isn't hard.  Most of the meals I have made have been extremely easy.  The difficult part is saying no to the junk, finding substitutes for sugar, and my own personal problem -- alternates to all the coconut.  

Some research has had to happen on my part, especially when creating a meal like today.  Thanksgiving dinner for us was completely Paleo, except for some of the desserts.


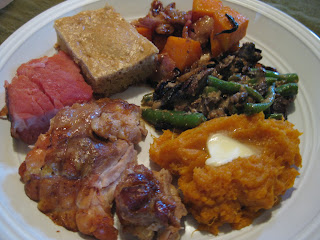
In the picture above, starting at the top and going clockwise, turducken, ham, corn bread, maple bacon pecan butternut squash, green bean casserole, whipped sweet potatoes.


Everything on that plate is Paleo friendly.  The only thing that you can't see is the cranberry sauce that I made. Yes, I made it, in fact, I made everything from scratch.  Well, I didn't make the turducken, I just bought that from the farmer's market and cooked it, I did buy the ham as well, but everything else I made.  I'm not going to go into details on how I cooked everything so here are the recipe links to everything I made today:  **note any place coconut oil is used I used bacon fat.
The whipped sweet potatoes were easy.  I just boiled the sweet potatoes for a good long while and when they were cool enough to handle I peeled them and threw them in my crock pot.  I mashed them with a potato masher, poured a little almond milk in, and put a nice coating of cinnamon over the top.  Mix it all up and let it cook on low in the crock so it stayed warm for dinner.  Easy dish to prepare in advance and let sit in the crock.


Look at those!  Apple pie tartlets.  Completely Paleo friendly and super yummy!  My oven cooked a little hotter than the recipe needed, so I probably should have pulled them out a bit earlier.  But, it didn't hurt and we all still loved them.  You can find the recipe over at PaleoOMG.


Sooo good!  I did make a pumpkin pie using a walnut pie crust but it wasn't Paleo friendly.  It was gluten free, but with the molasses and brown sugar, we broke from the diet.  But I say I'm ok eating it because it's my Grandpop's recipe for pumpkin pie and I just can't eat pumpkin pie unless it is his.  It was different eating it with a walnut pie crust, but it was still really good. 

Overall, I have to say this is the first year that my stomach isn't hurting after eating all this food!  I don't feel sick or bloated, I feel good.  I actually feel ready for round 2!  

Thursday, October 24, 2013

Paleo Bacon Chili


I had a fun day today.  A friend of mine is in cosmetology school and she had a makeup competition today and needed a model.  The students were allowed to pick their own themes and my friend decided to make me into a Viking Opera Singer.


We had a blast all morning.  She did a great job and when it came time to announce the winners, my friend placed second with the makeup she did.  I think we had a real shot at first, but look at the top three in the next picture.


Isn't that little girl just the cutest thing ever?!  How could we possibly beat her?  Third place was very well done (even if this isn't the best picture.)  The fun part was the whole outfit I'm wearing is actually mine, except for the wig.  I'm so glad I was able to go help my friend out and take a little detour out of my normal routine.  Thankfully, my hubby was home to do school with the kids.  In good news, he got a job but doesn't start working until Nov 4th, so we've got a little time home with him.  In fact, he's taking #2 hunting tomorrow morning for the youth season.  Good times for them!


Tonight's meal was an easy one.  I started by taking 2 yams and slicing them in half and sticking them in a 400 degree oven for 45 minutes.  While they were cooking I started the chili.  In a good sized pot, I started cooking the bacon slices.  I then started dicing all my veggies.  By the time I was done the bacon was browned and almost crispy.  I added the veggies in and let them cook for a few minutes.  I then added the ground beef and spices.  I cooked the meat till it was cooked through then added all the tomatoes and tomato sauce.  Let that simmer together for a few minutes then serve over the yams.  


Verdict: YUM!  So easy and delicious.  Everyone liked this meal.  I got the recipe from PaleOMG and tweaked it. Not from necessity, but because I couldn't find fire roasted tomatoes and didn't defrost my green peppers in time to get them in.  I substituted some sun dried tomatoes that I rehydrated and a can of diced tomatoes with green chilies and just omitted the green pepper.  Easy enough to do and it tasted just fine to us.

PALEO BACON CHILI
Serves 4-6

INGREDIENTS:
2-3 yams, cut in half
6 slices of bacon, cubed
1 small yellow onion, diced
1 red pepper, diced
1 clove garlic, minced
1 pound ground beef
1 TBSP garlic powder
1 TBSP chili powder
2 TBSP paprika
2 tsp cumin
Salt and pepper to taste
1 (8 oz) can tomato sauce
1 (10 oz) can diced tomatoes with green chilies
4 oz sun dried tomatoes

INSTRUCTIONS:
1. Split the yams in half, poke with a fork, and start baking them in a 400 degree oven for about 45 minutes or until they are tender.
2. Take the sun dried tomatoes and cut them up. Place in 4 oz of water to start to reconstitute them.
3. In a good sized pot, start cooking your cubed bacon. 
4. While bacon is cooking, chop all your veggies.
5. When the bacon has browned and is a bit crispy, add the veggies (onion, pepper, garlic) to the pot.
6. Let that cook for a few minutes then add the ground beef and all the spices.
7. When the beef is browned, add the tomato sauce, diced tomatoes, and sun dried tomatoes.
8. Mix everything up and cook for a while to let the flavors blend.  Cook on low for about 8-10 minutes, stirring occasionally.
9. Place the yam in a bowl, pour some chili on top, and eat it.  Yum!

Wednesday, October 23, 2013

Slow Cooker Paleo Pork Stew


Last night's dinner might have flopped, but this one sure didn't!  I started this recipe based off of Nom Nom Paleo's similar recipe and I tweaked it a bit.  I made some good choices in this!  Quick, easy, and so, so good! 


I started off by slicing one onion nice and thin and adding a small bag of baby carrots to my 6 quart crock pot.  I minced 6 cloves of garlic and threw that on top.  Have I told you all that I FINALLY got a Pampered Chef garlic press?  Oh my gosh I am in love with it!  That thing is awesome.  If you use garlic frequently, you need one of those.  

Anyways...  I cubed 3 pounds of pork shoulder roast and threw that in a bowl and dumped on 1 tablespoon of my organic seasoned salt.  I mixed that all up and threw it on top of the onions and carrots.  I then cut a head of cabbage into about 6 wedges and placed them on top of the pork.  Some Marinara sauce, salt and pepper, then I cooked it on high for 5 hours.  When it was done, I poured some Balsamic vinegar all over the top then mixed it all up.   


Verdict: This was a great meal tonight.  It was a cold day and this warmed us right up.  Very tasty and filling. Everyone loved this meal and it will be made again.

SLOW COOKER PALEO PORK STEW
Serves 4-6

INGREDIENTS:
1 small onion, sliced thin
6 cloves of garlic, minced
½ pound baby carrots
Sea salt
Freshly ground black pepper
3 pounds pork shoulder roast, cut into cubes
1 TBSP organic seasoned salt (or your favorite seasoning blend)
1 small cabbage, cut into 6-8 wedges
1 cup Paleo-friendly marinara sauce
1 TBSP Balsamic vinegar

INSTRUCTIONS:
1. In bottom of 6 quart crock pot (or large crock), lay down the sliced onions, carrots and minced garlic.  Season with salt and pepper.
2. In a bowl place your cubes of pork roast and coat with the 1 TBSP of organic seasoned salt.  Mix well.
3. Put the seasoned pork cubes on top of the vegetables in the crock.
4. Cut the cabbage into 6-8 wedges and lay on top of the pork cubes. 
5. Drizzle with marinara sauce.  Season with more sea salt and freshly ground pepper.
6. Cover and cook on high for 4-6 hours.
7. Take the lid off and drizzle with 1 TBSP Balsamic vinegar.  Mix all ingredients well.  Serve and enjoy.

Tuesday, October 22, 2013

Paleo Chicken Pot Pie and *Almost* Paleo Pot Stickers


You win some, you lose some.  Overall, this was a delicious meal, even if it looks like crap.  This is one of those "I adapted" meals and I'm not sure I like how it turned out.  


You see, this recipe for chicken pot pies that I got from Fed and Fit called for coconut oil in the crust recipe.  Well, I used almond oil instead and I don't think that was a good call.  The crust did not hold well together at all.  I was barely able to get it flattened into circles, off of the cutting board, and on to the ramekins.  


What was hanging over and "attached" to the side of the ramekins fell off while cooking.  What was inside at first turned into a mushy mess with the oils from the chicken pot pie, but as it cooled and "dried", it actually tasted quite good.  You can see in the last picture how the crust dried, but it still wasn't a crust.


I also made pot stickers today.  (It was a pot day... pot pie, pot stickers, crock pot applesauce.)  These took some time.  I had to prep the vegetables, then cook them in stages adding the meat, then cool it all for an hour.  The pot sticker wrappers were fairly simple to make.  6 eggs, separated, 2 cups of arrowroot flour, and a cup of water (mixed in stages).  These were cooked like little crepes, 1 tablespoon of batter crepes.  Here's where it wasn't exactly fun. You can only cook one at a time and it takes about 30 seconds for each side to cook.  Then you take it off the heat and immediately fill with 1 tablespoon of the meat and veggie mixture, then use a fork to seal them shut.  This takes quite a while.  After about 30 minutes in, I realized I had made about 10 pot stickers out of 31 that the recipe made. Thankfully, this was the time that my hubby came home and I put him to work filling and sealing the pot stickers while I just made the wrappers.

Once they were all made, I had to fully cook them.  This was interesting.  I took a non-stick skillet (same one I made the crepes in actually) and used a basting brush to brush on some bacon grease.   I put 5 pot stickers in the pan and didn't touch them for 2-3 minutes and just let them cook.  I flipped them and added 1/8 cup of chicken stock and let them steam for another minute or two.  I repeated the process for all 31 pot stickers.  There was a sauce that I could have made but I didn't take the time to make it.  I'll put it in the instructions below.  I say this recipe is *almost* paleo (which means it wasn't) because I used soy sauce in it.  The original recipe from Paleo Cupboard called for coconut aminos but I haven't found a non-coconut substitute for those yet, just soy sauce which isn't paleo friendly.  If anyone has any non-coconut suggestions for coconut aminos that are paleo friendly, please tell me!


Verdict: For as ugly as this chicken pot pie is, it tasted good. We all agreed on that.  The pot stickers were delicious as well!  I don't think I would ever cook these 2 recipes on the same day again, just too much work involved.  Throw in making applesauce at the same time and I was just plain crazy.  But good tasting food, and knowing I have a supply of Paleo applesauce, makes all the work in the kitchen worth it.  Look for tomorrow's post. I made applesauce because I got a half bushel of apples for $10 so I'm making lots of fun items with apples right now. Who knows what I'll make tomorrow?  Well, I do, but you don't!

PALEO CHICKEN POT PIE
Makes 8 Pot Pies

INGREDIENTS:
Crust:
3 cups almond meal
1 ½ tsp salt
1 tsp baking powder
½ cup almond oil (I suggest using less to see if the crust holds together better than mine)
1 TBSP cool water
1 egg (for egg wash after placed on pies before cooking)

Pie:
2 chicken breast halves, cooked and cut into ½” cubes
1 yellow onion, chopped
5 green onions, chopped
2 cups frozen green peas
2 cups carrots, chopped
¼ cup almond milk
¾ cup almond meal
4 cups chicken stock
3 TBSP EVOO (Extra Virgin Olive Oil)

INSTRUCTIONS:
1. Cook, cool, and cut chicken breasts into ½” cubes.
2. Start to prepare your crust by mixing the dry ingredients in a food processor.
3. Add the almond oil and slowly pulse until it’s evenly mixed.  It should have the consistency of peas.
4. Slowly add the water and pulse until it forms a dough-like texture.
5. Remove from food processor, roll into a ball, and wrap in cling wrap.
6. Put the dough into the refrigerator for 30 minutes.
7. Start your pie filling by heating the EVOO in the bottom of a large pot.
8. Add the onions and cook on medium – medium high until they are browned.
9. Slowly add the almond meal and reduce the heat to medium.
10. Slowly add the chicken stock and stir.
11. Add the almond milk, salt, peas, carrots, and chicken.
12. Cook for another minute or two.
13. Evenly distribute between your 8 ramekins (or other oven-friendly bowls.)
14. Dust a cutting board with almond meal.
15. Place the ball of dough on the dry almond meal and cut into 8 even sections.
16. Using your hands first (and then a rolling pin for even thickness), press and roll each of the 8 pieces into a circle.
17. Keep dusting the top and bottom of dough with dry almond meal so that it doesn’t stick.
18. Use the ramekin or dish you are baking in to cut the right sized circles in the dough.
19. Place the crust on top of the filling and paint with the scrambled egg for egg wash, cutting a couple of slits in the top.
20. Bake for an hour at 375.

*ALMOST* PALEO POT STICKERS
Makes 30+ Pot Stickers

INGREDIENTS:
Filling:
2 TBSP bacon fat
1 small onion, finely chopped
2 cloves garlic, minced
1 carrot, finely chopped
½ lb ground pork
3 green onions, finely chopped
2 cups cabbage, finely chopped
3 TBSP soy sauce or coconut aminos (coconut aminos are paleo, soy sauce isn’t)
2 tsp sesame oil

Wrapper:
6 large eggs, separated
2 cups arrowroot powder
1 cup water

For Cooking Pot Stickers:
2 TBSP bacon fat
¾ cup chicken broth

Dipping Sauce:
2 TBSP soy sauce or coconut aminos (coconut aminos are paleo, soy sauce isn’t)
1 tsp apple cider vinegar
Chili sauce or hot sauce to taste

INSTRUCTIONS:
1. Prep all of your vegetables.  Seriously, prep them all first. They cook too quick to start prepping and cooking at the same time.
2. Add the bacon fat to a large saute pan or cast iron skillet over medium high heat.  Add the garlic, small onion, and carrots.  Saute for about 3 minutes.  Add the pork and cook for another 5 minutes or till cooked through, breaking up the pork into small pieces.
3. Add the green onion, cabbage, and remaining filling seasonings to the pan and stir to combine all ingredients.  Taste and adjust seasonings as needed.
4. Take the pork mixture off the heat and place in a mixing bowl.  Allow to cool in the fridge for at least 1 hour.  You can leave this overnight if you want to prepare a day ahead.
5. 30 minutes in to the cooling, start making your wrappers.  Separate the egg yolks from the whites and set the yolks aside.  Beat the egg whites until very frothy.  Gently add back the yolks until combined.
6. Mix the water and arrowroot powder together in a separate bowl and slowly stir into the egg mixture until combined.  The mixture will be very wet and runny.  Set the mixture aside for at least 20 minutes.  Stir the mixture well before using and stir a few times throughout the process of cooking the wrappers as the arrowroot powder will separate.
7. Get your pork filling mixture and keep it nearby, with a spoon, fork, and a plate to hold the pot stickers.
8. Heat a small non-stick skillet over medium heat.  Pour about 1 TBSP of the wrapper mixture into the skillet and use the back of a kitchen spoon to quickly flatten it out, using a circular motion.  It takes a little practice to get this right.  You want the circle to be about 6 inches in diameter.  It will look like a thin crepe.
9. Cook the mixture for about 30 seconds on each side, then remove from the pan.  You don’t need the wrappers to be cooked through all the way because you will be cooking them again later.  Immediately take the wrapper and place about 1 TBSP of pork filling in the center of the wrapper.  Fold in half, place on a plate and press the edges together with a fork so they seal.  You can also use a dumpling press or a traditional folding technique, but I just used a fork.
10. Continue this process until all filling is gone and you have a bunch of pot stickers.  It goes a lot quicker if one person makes the wrappers and the other fills and seals them.
11. When finished making the pot stickers, you need to cook them.  Keep the pan heated over medium heat.  Lightly brush with bacon fat.  Add about 5 pot stickers (make sure they are not touching) and allow to cook for 2-3 minutes.  Do not touch them!  After 2-3 minutes flip then add about 1/8 cup chicken broth to the pan, cover, and allow to steam for 1-2 minutes.  *I thought they tasted better when I didn’t put the lid on and they still kind of steamed, but they weren’t as soggy and a little more crispy.
12. Transfer the pot stickers to a plate and continue this process until all pot stickers are cooked.  Serve with dipping sauce.
13. Dipping sauce can be made by combining the dipping sauce ingredients in a bowl.